Creating a blog with Contentlayer Part 1
Faustino Zanetto
Post Author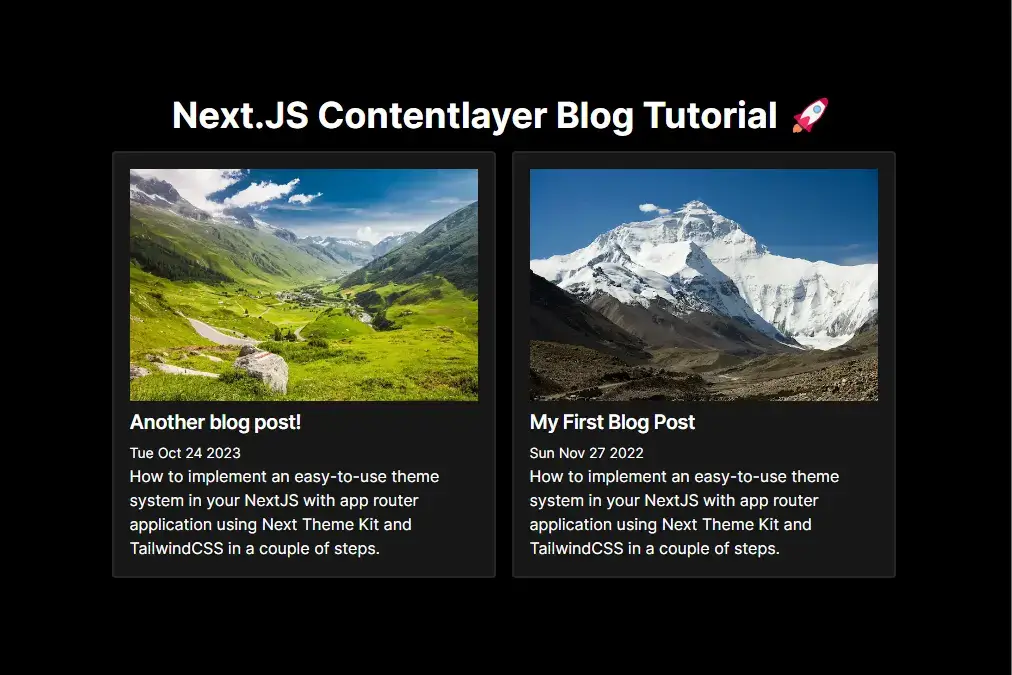
🌟 Introduction
In this blog post, we'll take you on a journey to create a dynamic blog system using cutting-edge technologies. We'll harness the capabilities of Next.js, and we'll introduce you to the incredible Contentlayer library. Together, we'll explore how to implement a simple yet powerful blog system that leverages the latest in web development.
📚 Prerequisites
To make the most of the upcoming content, it's helpful to have a fundamental grasp of web development with React, TypeScript, and Next.js. Familiarity with these technologies will enable you to follow along more smoothly. Don't worry if you're new to Contentlayer; we'll explore it together as we progress through the tutorial.
🚀 Setting Up NextJS 13 App
We will begin by creating our own Next.js app using a popular npm package called create-next-app. This CLI tool provides us with an easy-to-use command-line interface to bootstrap applications using this amazing framework.
To create a basic app we will execute the following command in our terminal:
pnpm create next-app --tailwind nextjs-contentlayer-blogI will be using pnpm for the rest of the tutorial but you can use the package manager of choice such as yarn or npm.
If you have not installed this package before, the create-next-app package will be installed globally. Following that, you will be prompted with a series of questions regarding the configuration of the app. The first question will be about the name; you can choose any name you like. For example, "next-app-router-themes". Afterward, you will select "Yes" to all the questions regarding using TypeScript, Tailwind CSS, ESLint, the src/ directory, and App Router. Once you have answered all the prompts, the project will be ready to start implementing the theme system.
What is your project named? next-app-router-themes
Would you like to use TypeScript? No / Yes
Would you like to use ESLint? No / Yes
Would you like to use Tailwind CSS? No / Yes
Would you like to usesrc/directory? No / Yes
Would you like to use App Router? (recommended) No / Yes
Would you like to customize the default import alias? No / Yes
After the installation has finished, you will have the following files and directories inside the project folder:
  ├── public
      ├── next.svg
      └── vercel.svg
  └── src
      ├── app
        ├── favicon.ico
        ├── globals.css
        ├── layout.tsx
        └── page.tsx
  ├── .eslintrc.json
  ├── .gitignore
  ├── next-env.d.ts
  ├── next.config.js
  ├── package.json
  ├── postcss.config.js
  ├── README.md
  ├── tailwind.config.js
  ├── tsconfig.json
  └── pnpm-lock.lock
📦 Adding Contentlayer to our application
With our basic Next.js application up and running, our next exciting endeavor is to elevate its capabilities by incorporating the essential dependencies necessary to establish a fully functional blog system. We've laid the groundwork, and now it's time to construct a robust platform that will enable us to publish and manage our blog content with effortless efficiency.
Our first step in this journey is to introduce the cornerstone dependency, Contentlayer. To do this, navigate to your preferred terminal and execute the following command:
pnpm install contentlayer next-contentlayer date-fnsOnce this command completes, we will have successfully integrated the core Contentlayer package, along with the invaluable utility package it provides specifically tailored for Next.js.
⚙️ Configuring NextJS
With our essential dependencies in place, the next crucial step is configuring our Next.js application. To achieve this, we need to make adjustments to the next.config.js file, which is located in the root folder of our project. Follow these steps to apply the necessary changes:
const { withContentlayer } = require('next-contentlayer');

/** @type {import('next').NextConfig} */
const nextConfig = { reactStrictMode: true, swcMinify: true };

module.exports = withContentlayer(nextConfig);
In this configuration update, we've employed the withContentLayer function imported from the recently added next-contentlayer package. This allows us to seamlessly integrate Contentlayer into our Next.js application. Additionally, remember that you can still customize the nextConfig object to suit your specific needs and preferences.
Now, it's time to enhance our development experience by adding a path alias to our tsconfig.json file. This will make it easier to reference and use later on in our project. Follow these steps to update your tsconfig.json file:
-
Open your
tsconfig.jsonfile, which is typically located in the root folder of your project. -
Add the following changes to your
tsconfig.json:
{
  "compilerOptions": {
    "baseUrl": "./src",
    "paths": {
      "@contentlayer/generated": ["../.contentlayer/generated"]
    }
  },
  "include": [".contentlayer/generated"]
}
By doing so, we tell the Typescript compiler that it should include the file that contentlayer will generate as an output as well as setting up the path alias.
We also need to add a folder to our .gitignore file so that we do not push unwanted files to our repository. Locate your .gitignore and add the following changes:
...

# add this
.contentlayer
📄 Creating our Content Schema
Now that we finished setting up the actual configuration files, we need to start digging into the schema definition for our blog posts.
To do so, create a file called contentlayer.config.ts in the root folder of your project. Then proceed to add the following code to it:
import { defineDocumentType, makeSource } from 'contentlayer/source-files';

export const BlogPost = defineDocumentType(() => ({
  name: 'Post',
  filePathPattern: `**/*.md`,
  fields: {
    title: {
      type: 'string',
      required: true,
    },
    description: {
      type: 'string',
      required: true,
    },
    image: {
      type: 'string',
      required: true,
    },
    publishDate: {
      type: 'date',
      required: true,
    },
    tags: {
      type: 'list',
      of: {
        type: 'string',
      },
      required: true,
    },
  },
  computedFields: {
    url: {
      type: 'string',
      resolve: (post) => `/posts/${post._raw.flattenedPath}`,
    },
  },
}));

export default makeSource({
  contentDirPath: 'content',
  documentTypes: [BlogPost],
});
Lets break down whats going on in this code snippet:
- Import Statements:
import { defineDocumentType, makeSource } from 'contentlayer/source-files';Here, we're importing two functions,
defineDocumentTypeandmakeSource, from thecontentlayer/source-filesmodule. These functions are essential for defining the structure of content documents and creating a data source for your blog.
- defineDocumentType Function:
export const BlogPost = defineDocumentType(() => ({
  // ...
}));
We define a document type named BlogPost using the defineDocumentType function. This function allows us to specify the structure and metadata of a content document.
Inside the function, we define various properties for our blog posts, such as
name,filePathPattern,contentType, andfields. These properties describe how content documents of this type should be identified and structured.
For more information about modeleing the documentType head down to the Contentlayer documentation page docs.
- makeSource Function:
export default makeSource({
  // ...
});
The makeSource function is used to create a data source for our content. We provide the
contentDirPathproperty, specifying the directory where our content documents are stored. In this case, it's set to 'content'. We also specify an array ofdocumentTypes, which includes theBlogPostdocument type we defined earlier.
In summary, this code defines the structure of a BlogPost document type, including its fields and metadata, and then uses the makeSource function to create a data source for content located in the 'content' directory. This setup allows you to manage and display blog posts with specific attributes like title, description, image, publishDate, and tags.
🖋️ Creating our first post
With contentlayer configured and all the essential files in place, it's time to breathe life into your blog by creating captivating content! To get started, follow these simple steps:
-
Create the Content Directory: Begin by crafting a folder that aligns with the name we designated at
contentDirPath. In our case, we'll name itcontent. Ensure this folder resides in the root directory of your project. -
Create Your First Blog Post: Let your creativity flow as you create a file with a name of your choosing and give it the .mdx extension. As an example, I'll name mine
my-first-blog-post.mdx. -
Populate Blog Post With Data:
Now, you're ready to dive into the world of content creation, where you can share your thoughts, insights, and stories with your readers. Your freshly crafted my-first-blog-post.mdx file is your canvas, and the possibilities are endless!
content/
└── my-first-blog-post.mdx
Now, it's time to infuse life into your blog post by providing essential metadata. In our case, we'll adhere to the structure we meticulously defined earlier in our contentlayer.config.ts within the fields object. Let's illustrate this with a practical example:
---
title: My First Blog Post
description: How to implement an easy-to-use theme system in your NextJS with app router application using Next Theme Kit and TailwindCSS in a couple of steps.
image: /mountain.webp
publishDate: 2022-11-28
tags:
  - nextjs
  - tailwindcss
---
As you can see we defined between the triple '-' the metadata that each post will have and we will use then to display information about the post in a card.
Additionaly you can start to dive into writing your own blog content using common Markdown standards below the metadata. For example:
# Introduction

Welcome to my blog, where we embark on an exciting journey into the world of web development. In this inaugural post, we'll explore the basics of building a modern website using popular technologies like Next.js, Tailwind CSS, and Contentlayer.🏃🏻♂️ Running our Application
With your blog post file in place, it's time to fire up your Next.js application. Simply execute the following command in your terminal:
pnpm run devIf everything has been set up correctly, you should witness your application compiling without a hitch. Keep an eye on your terminal for the reassuring message:
Generated 1 documents in .contentlayerThis confirmation signifies that Contentlayer has seamlessly detected your newly created file and efficiently generated the necessary files for your blog.
🛠️ Setting Up Components
Now that we've covered the essentials of blog post creation and Contentlayer integration, it's time to shift our focus to creating the necessary pages and components to elegantly display our blog posts.
To kickstart this process, we'll begin by enhancing our home page. Navigate to the src/app directory and locate the page.tsx file, which represents our / route in the application. Now, simply copy and paste the following code:
import { allPosts } from '@contentlayer/generated';
import PostCard from 'components/post-card';
export default function Home() {
// Sort the blog posts by publish date in descending order
const posts = allPosts.sort((a, b) => new Date(b.publishDate).getTime() - new Date(a.publishDate).getTime());
return (
<main className="flex min-h-screen flex-col items-center justify-center">
<h1 className="text-4xl font-bold mb-4">Next.JS Contentlayer Blog Tutorial</h1>
<div className="grid grid-cols-2 gap-4">
{posts.map((post) => (
<PostCard key={post._id} post={post} />
))}
</div>
</main>
);
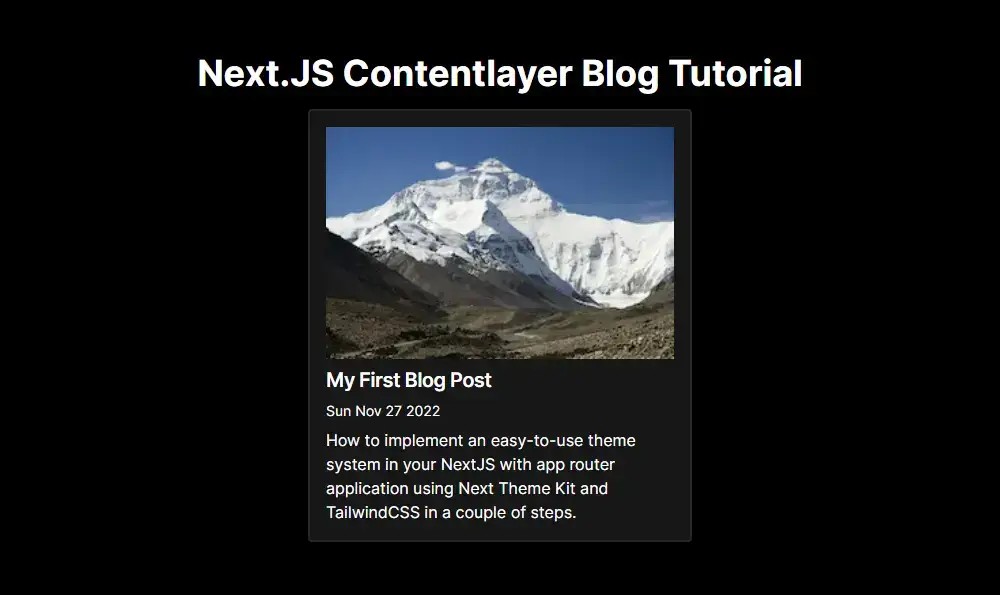
}This code enhances our home page to dynamically display your blog posts in descending order of their publish date. Each blog post is represented by a PostCard component, offering an organized and engaging presentation of your content."
Next on our agenda is the creation of the PostCard component, a vital element for showcasing our blog posts. To get started, follow these steps:
-
Create a New Folder and File:
- Begin by creating a new folder named components under the src directory.
- Inside the components folder, craft a file named
post-card.tsx.
-
Paste the Following Code:
- Copy and paste the code snippet below into your newly created
post-card.tsxfile:
import React from 'react';
import Link from 'next/link';
import Image from 'next/image';
import { Post } from '@contentlayer/generated';

type PostCardProps = {
  post: Post;
};

const PostCard: React.FC<PostCardProps> = (props) => {
  const { post } = props;

  return (
    <Link href={post.url}>
      <div className="bg-neutral-100 p-4 border-neutral-200 dark:border-neutral-800 border-2 rounded shadow dark:bg-neutral-900 max-w-sm">
        <Image
          className="w-full bg-no-repeat object-cover mb-2"
          src={post.image}
          alt={`${post.title} Image`}
          width={500}
          height={500}
        />
        <h3 className="mb-1 text-xl font-semibold leading-snug tracking-tight">{post.title}</h3>
        <time dateTime={post.publishDate} className="mb-2 text-sm">
          {new Date(post.publishDate).toDateString()}
        </time>
        <p>{post.description}</p>
      </div>
    </Link>
  );
};

export default PostCard;
This code defines the PostCard component, which will be responsible for displaying each blog post with an image, title, publication date, and a brief description. The component is designed to enhance the readability and aesthetics of your blog posts, providing an engaging user experience."
Now, return to your web browser to witness the fruits of your labor. Your page should now be taking shape, resembling the following layout
👓 Creating Blog Post Page
Now that we've fine-tuned our home page to showcase all our blog posts, it's time to craft individual pages where each post will come to life. To achieve this, follow these steps:
-
Create a New Directory:
- Begin by creating a new directory under the
src/appfolder and name itblog/[slug].
- Begin by creating a new directory under the
-
Craft a New File:
- Inside the
blog/[slug]directory, create a file namedpage.tsx.
- Inside the
-
Paste the Following Code:
- Copy and paste the provided code into your newly created
page.tsxfile:
- Copy and paste the provided code into your newly created
import { allPosts } from '@contentlayer/generated';
import { Metadata } from 'next';
import Image from 'next/image';
import { notFound } from 'next/navigation';

type PostPageProps = {
  params: {
    slug: string;
  };
};

export async function generateStaticParams(): Promise<PostPageProps['params'][]> {
  return allPosts.map((post) => ({
    slug: post.url,
  }));
}

export async function generateMetadata({ params }: PostPageProps): Promise<Metadata> {
  const post = allPosts.find((post) => post._raw.flattenedPath === params.slug);

  if (!post) throw new Error(`Could not find post for slug: ${params.slug}`);

  const { title, description } = post;

  return {
    title,
    description,
  };
}

export default async function PostPage(props: PostPageProps) {
  const { params } = props;

  const post = allPosts.find((post) => post._raw.flattenedPath === params.slug);

  if (!post) notFound();

  return (
    <article className="container py-10 mx-auto max-w-5xl px-4">
      <div className="mb-8">
        <Image
          className="w-full bg-no-repeat object-cover mb-2 h-80"
          src={post.image}
          alt={`${post.title} Image`}
          width={500}
          height={500}
        />
        <h1 className="mb-1 text-xl font-semibold leading-snug tracking-tight">{post.title}</h1>
        <time dateTime={post.publishDate} className="mb-2 text-sm">
          {new Date(post.publishDate).toDateString()}
        </time>
        <p className="mt-1.5">{post.description}</p>
      </div>
      <div className="[&>*]:mb-3 [&>*:last-child]:mb-0" dangerouslySetInnerHTML={{ __html: post.body.html }} />
    </article>
  );
}
This code sets the stage for creating individual blog post pages. Each post will be elegantly rendered with its title, publication date, description, and the main content body. With this setup, your blog posts will shine individually, providing an immersive reading experience for your audience.
-
generateStaticParams() Function:
- Generates static parameters for blog post pages using allPosts data, facilitating static route generation in Next.js.
-
generateMetadata() Function:
- Generates metadata, including title and description, for individual blog post pages based on the provided params and allPosts data, aiding SEO and previews.
-
PostPage() Function:
- Defines the layout and content structure for individual blog post pages, retrieving and displaying post data while handling non-existent post scenarios.
Now, let's take a journey to the home page and click on any blog post card that piques your interest. You'll be greeted with the splendid sight of the new blog post page, where you'll witness the following outcome:
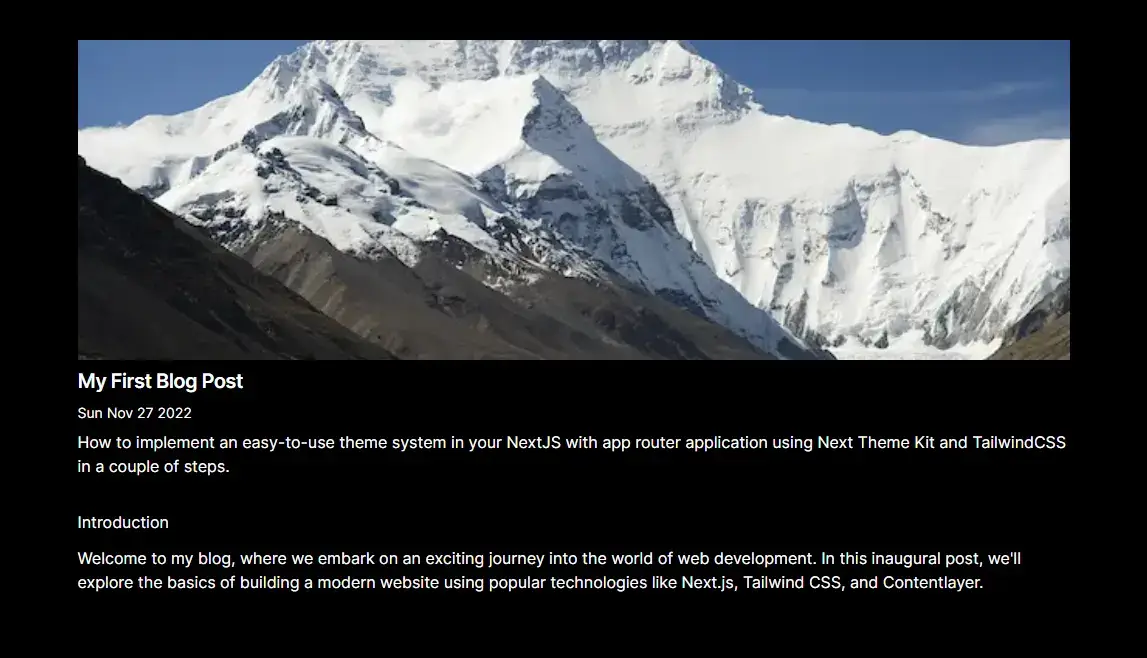
Behold, all the metadata from the file gracefully manifests itself on this page, presenting you with the post's title, captivating image, informative description, and more. It's a seamless and engaging reading experience that ensures you get the most out of each blog post.
Conclusion
🎉 Congratulations on reaching this exciting milestone in your journey of building a blog with Contentlayer and Next.js! 🚀 You've successfully laid the foundation for your blog, created dynamic blog post pages, and beautifully displayed metadata. With these essential components in place, you're now armed and ready to create and share captivating content with your audience. 📝✨ Keep exploring, innovating, and sharing your knowledge with the world through your blog.
If you're eager to dive even deeper into the code and explore the inner workings of this tutorial, you can find the complete Git Repository here. Feel free to browse the code, contribute, or use it as a reference for your own projects. Happy coding and blogging! 🌟👏
🚀 This is just the beginning! Stay tuned for Part 2 of our tutorial, where we'll delve into more advanced topics, enhance the functionality of your blog, and help you take it to the next level. 📈✨
Emoji Feedback
I'd love to hear your thoughts! Share your emoji reactions to this blog post with me. What's your emoji review? 😄👏👍🤔🎉
Share the Post
Spread the knowledge! Share this insightful blog post with your friends and colleagues on multiple platforms.